Wednesday, September 25, 2013

How to build a stuffed animal zoo!

How many of you buy WAY too many stuffed animals for your kids?  We all are guilty of it...even Kohls makes us feel bad if we don't buy one of their "Kohls Cares for Kids" stuffed animals!  I mean it helps kids!  And who can go to the mall without hitting up Build A Bear.  My kids stuffed animal collections were out of control.  So I went looking for an easy solution.  That's when I found the Stuffed animal zoo!!  It was perfect!  It would house them all and it was great!  Problem?  It was 157.00 plus shipping.  WOWZERS!  I'd rather have mess than pay that much.  I read lots of DIY blogs about it and decided to attempt to my my own.  I used 1x2s because they are cheap.  I used 3- 1x2x8s and 4-1x2x6s.
First cut 3- 1x2x8s into 24" pieces.  (you can have home depot do this for you)  Now you have 12- 24in pieces.

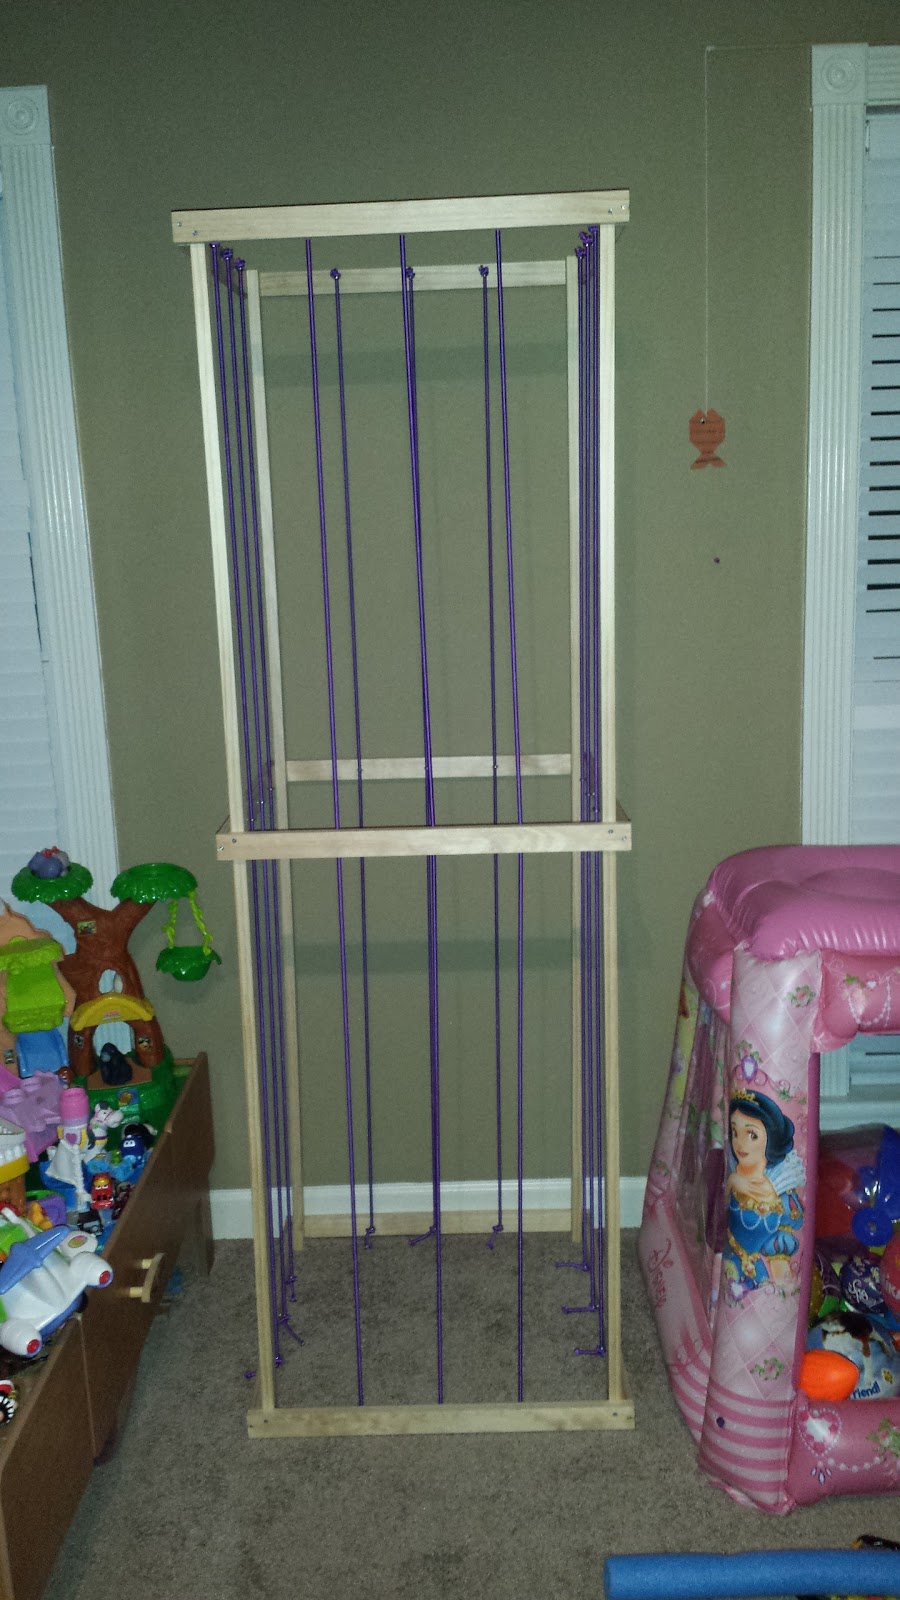
I used 4 pieces to form a square and screwed them together.  I did this three times, so you have three 24x24 square boxes.  One I had this done, I used 4- 1x2x6 pieces to nail the three frames onto.  The first box I made is on the bottom...


Note: Don't do projects on a plush area rug...do it on a hard floor so your poles are even.  If you don't, it's OK...you can "fix" it when you put the last box on top!

Put your second box in the middle and screw it onto the posts.  Remember to use a level!  Then screw the top box on.  It should look like this:

The next step is to install the eye hooks to the inside of the frame.  

These things are hard to get in, so I pre-drilled the holes and then used a pencil to turn them into the wood.


I used 3 eye hooks on each of the 4 sides.  So you will need 36 of them.  Once you are finished it's time to put the bungee cord on.  I used roughly half of this:

Take the bungee cord and pull it through one set of  eye hooks going down. Knot the end at the top.  Pull it kind of tight and cut the cord.   Then knot the bottom.  Just make sure it's tight so that your animals wont fall out.  Continue to do this on all 4 sides until your zoo looks like this:

Then find a good spot for it in your playroom or kids room...


And finally...fill it full of animals!!!

OK...now here is what I'd do different:
Instead of buying 3-1x2x8s, I'd buy 1x3x8s.  The frame will be sturdier.  Then I would NOT cut them all in 24" pieces.  I would make the zoo a rectangle.  12"x24" pieces would be better.  I also would not make it 6 ft tall.  4 ft tall would be a great height for this!  I also might make 4 bungee lines instead of 3.  This would help keep in the smaller animals that fall out of mine.

All in all it's a good zoo...but for our needs, you will probably see another blog post about a NEW zoo before Christmas. :)

Wednesday, September 18, 2013

How to stencil a toy box...

After painting Jillian's toy box with Annie Sloan Chalk Paint, I've been wanting to put something on it.  I bought some stencils, but nothing really seemed right for this piece.  I decided I wanted to put her name on it. No stenciled letters were really big enough and I hated all the fonts.  I typed her name in Word and proceeded to look at ALL the fonts  I hated them all.  Then I found this fun little website with TONS of fonts to choose from!  I decided on VTKS Dear Love from fontspace.com...

http://www.fontspace.com/vtks-design/vtks-dear-love

Once I typed her name, I realized it was NOT big enough.  So I put it in Microsoft Paint and blew it up.  It took two sheets of paper to print it, so  I taped them together.  Once I cut around the letters a little , I used a charcoal pencil and colored the entire back of the paper.  Then I used painters tape to put it on the toy box.


Once it was in place, I took a regular pencil and traced over the letters.  The charcoal on the back made the perfect outline for me to paint...


Next I just used regular acrylic paints and painted over the charcoal...


Then I took a damp paper towel and rubbed off all of the charcoal...


I liked it better with the charcoal outline, so I decided to go around it with a green paint pen and it was finished!


I'm still trying to decide what else to put on it.  Any suggestions, please feel free to comment below!

Thursday, September 12, 2013

Framed fabric

We moved into our house in 2005.  Since then I've put things on the walls all over the house.  Well, except for my bathroom.  We have this great tub with columns around it and a beautiful chandelier hanging above it.  Then there is the big BLANK wall behind it.  Over the years I've looked at that wall a million times getting out of the shower and wondered what to put there.  Someone suggested a mirror.  UM, I dont know about you, but I dont like to stare at myself naked when I'm stepping out of the shower or climbing in/out of the tub.  Ewe.  No picture from Hobby Lobby, the starving artist shows, etc ever really fit in that space.  When we were cleaning out the garage, I found this HUGE ugly frame someone had given me to re purpose a long time ago.  (I had two of these frames and painted the other one a metallic silver and hung 52 pictures of my daughter on it for her first birthday.)  Since hanging pictures with no glass in a humid room is probably frowned upon, I looked for other options.  Fabric seemed to be a great idea.  Did you know that Hancock Fabrics has a whole other side of their store...with furniture fabric?  How did I miss that???  I found the perfect fabric and headed home.  Well my huge frame was 40 x 46 and the fabric was too narrow.  BUMMER!  I decided to buy some black duck fabric and make a matte around it.  My sewing skills are NOT great, but it's a strait line people...you can do it!
I pinned it first, then sewed all the way around.  I had to cut fabric off after that so it would be even.  Dont worry about it being perfect, you will just staple the fabric directly onto the frame so no one will see the messy edges.


I duck taped the fabric to my UGLY frame to see if it was even before I painted and stapled it.


I decided on Krylon's smokey gray gloss paint. 


LOVE!  Spray paint can make any frame beautiful again!  I did another coat that night.  Once it was dry, I took it inside to staple it.

Sadly, I didn't get any pictures of the actual stapling part because I had a 2 year old helping me.  But this is what it looked like when it was finished...and yes, it's not perfectly even...read the sentence before! LOL!


And after my sweet husband helped me lift this massive thing on the wall...


I'm sad the frame almost looks blue with the lighting, but finally having something on that wall is great!!

Monday, September 9, 2013

How to transform your child into CAPTAIN UNDERPANTS!!!!!!!!

The annual book character parade at my son's school is coming up.  In Kindergarten he wanted to be Firefighter Ted.  An adorable and super easy store bought costume later...


For first grade, I COMPLETELY forgot!  When we got to car line, he was in tears because he didn't have a costume.  I raced home and found his favorite book...DOCTOR Ted!  I dug through the costume tub and found a doctor shirt and stethoscope and drove 80mph back to his school...

Yeah, I didn't realize that the doctor costume was like a 5t!  OOPS!  But look at that face.  He was just so happy I made it back in time for him to participate!

This year I planned ahead.  I asked him what book he wanted to do as SOON as school started.  He wanted to be Captain Underpants!


So I went to find him a costume.  Sadly, that is NOT one you can buy!  I figured it would be easy to make one.  I mean it's a dude in his underwear with a cape!  Easy-peasy!  Well since NO ONE sells flesh colored shirts, I had to make one...

 I used half the bottle and 3 gallons of water in my sink.  I stirred it continuously for about 10 minutes and then took it out.  It was starting to get too dark.  I washed and dried it alone on the 20 minute cycle with a small amount of laundry detergent.


When it came out it was a perfect flesh color!  WOOHOO!!!   

Next, I took a sharpie to a pair of underwear that were 2 sizes too big for him...


I outlined it all the way around and put dashes on the top.

When he tried it on, he told me the cape needed to be cut and it needed dots on it.  He was VERY particular about how he wanted this costume...maybe he WAS embarrassed by last year's costume! ;)  So I gave him a sharpie and he dotted and then I cut it...

We also added two dots on the t shirt for nipples. When it was all done we tucked his shorts into the underwear, someone snapped and Braden became..Captain Underpants! TRA LA LA!!!!!!!


A full TWO days before the book parade!   He is so excted about wearing this tomorrow, but he still doesn't understand why he has to wear shorts under the underwear. *sigh* Boys.

Bonus...he loved it so much, this will also be his halloween costume!


The picture wall clock

I'm sure you've all seen a version of those wall clocks on Pinterest or Etsy, but I didn't quite like any of them.  I wanted fun frames, more color, etc.  When making another project for a friend, I just happened to find the perfect frames at Hobby Lobby!  They are on sale about every other week 50% off, so it pays to wait a week!

The only problem...there were not enough colors for me to do 12 frames.  But I kept looking and found these desktop frames...

PERFECT!  Now all 12 frames could be different colors.  Ripping the flap off the back was a bit tricky, but by the time I got to the last one it was easy!  The key is use a flat-head screwdriver and pull out the rivets at the top...then the flap slides right off.  You don't want to see the first few I did. LOL!

So now I had these perfect frames, but I needed the clock mechanism and some cute vinyl letters.  I headed to Etsy and found this...

Since I didn't need frames, I asked the seller if I could just buy the clock hands and wording.  She made me a special listing.  It was GREAT, she even included instructions!  Mo is amazing!  The vinyl lettering is so easy to apply with her instructions!  I love this because your letters are perfectly strait!  She now has this same listing in her shop, so go buy it and tell her Jennifer send you!
http://www.etsy.com/listing/160510898/large-wall-clock-kit-lettering-no-frames?ref=shop_home_active

After installing the clock hands on the wall, I used the template Mo provided and hung the frames.  I was tired and really just eyeballed it.  But I love the final product!!

What do you think?  And yes, it keeps perfect time! :)
Feel free to leave comments or ask questions if you need help making your own clock!

Welcome to my blog!!

Welcome to DIY or cry!  I hope you find your next DIY project here!  Stress is really bad for your health. Being a mom is tough work!  To help my stress level, I started doing little DIY projects. My friends said I needed a "pintervention" but I figured I'd just start a blog instead.  I mean, I TOTALLY have time for that! LOL!  Hopefully this blog will make me a more organized person...or it will make my house messier.  Either way enjoy!